Key Features and Benefits
Wie man Memberstacks Hosted Content Feature verwendet
Dieser Artikel zeigt Ihnen, wie Sie die Funktion " Hosted Content" von Memberstack nutzen können. Mit diesem praktischen Tool können Sie den Zugriff auf geschützte Inhalte basierend auf dem Anmeldestatus des Benutzers steuern. Wenn sich ein Benutzer beispielsweise bei seinem Webflow-Konto anmeldet, zeigt die Seite eine aktive Download-Schaltfläche an. Für abgemeldete Besucher der Website deaktiviert Webflow die Schaltfläche.
Wir zeigen Ihnen auch, wie Sie dieses Tool erweitern können, indem Sie einen gesicherten Menü-Link hinzufügen, der nur für angemeldete Benutzer angezeigt wird.
Angemeldeten Status erstellen
Der erste Schritt besteht darin, einen Anmeldestatus für Webflow-Benutzer zu erstellen. In diesem Beispiel ist die Benutzeroberfläche eine Download-Schaltfläche mit einem Anhang.

Sobald das alles eingerichtet ist, müssen wir die Website veröffentlichen, die veröffentlichte Seite aufrufen und den HTML-Code der Schaltfläche kopieren.
- Klicken Sie mit der rechten Maustaste auf das Element, das Sie in Memberstack speichern möchten.
- Wählen Sie Prüfen.
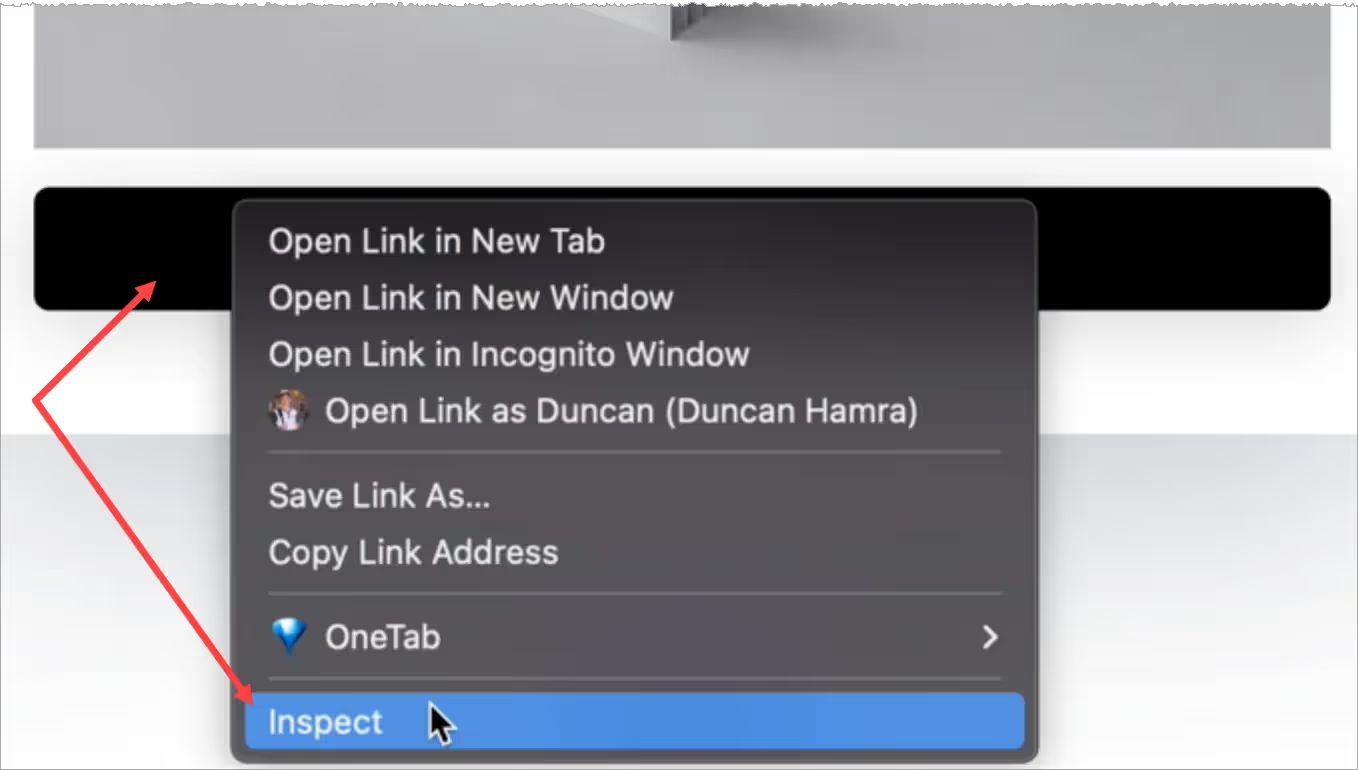
- Gehen Sie zum Bedienfeld Elemente und kopieren Sie den HTML-Code der Download-Schaltfläche.

Einrichten von Memberstack
Gehen Sie zu Ihrem Memberstack-Konto.
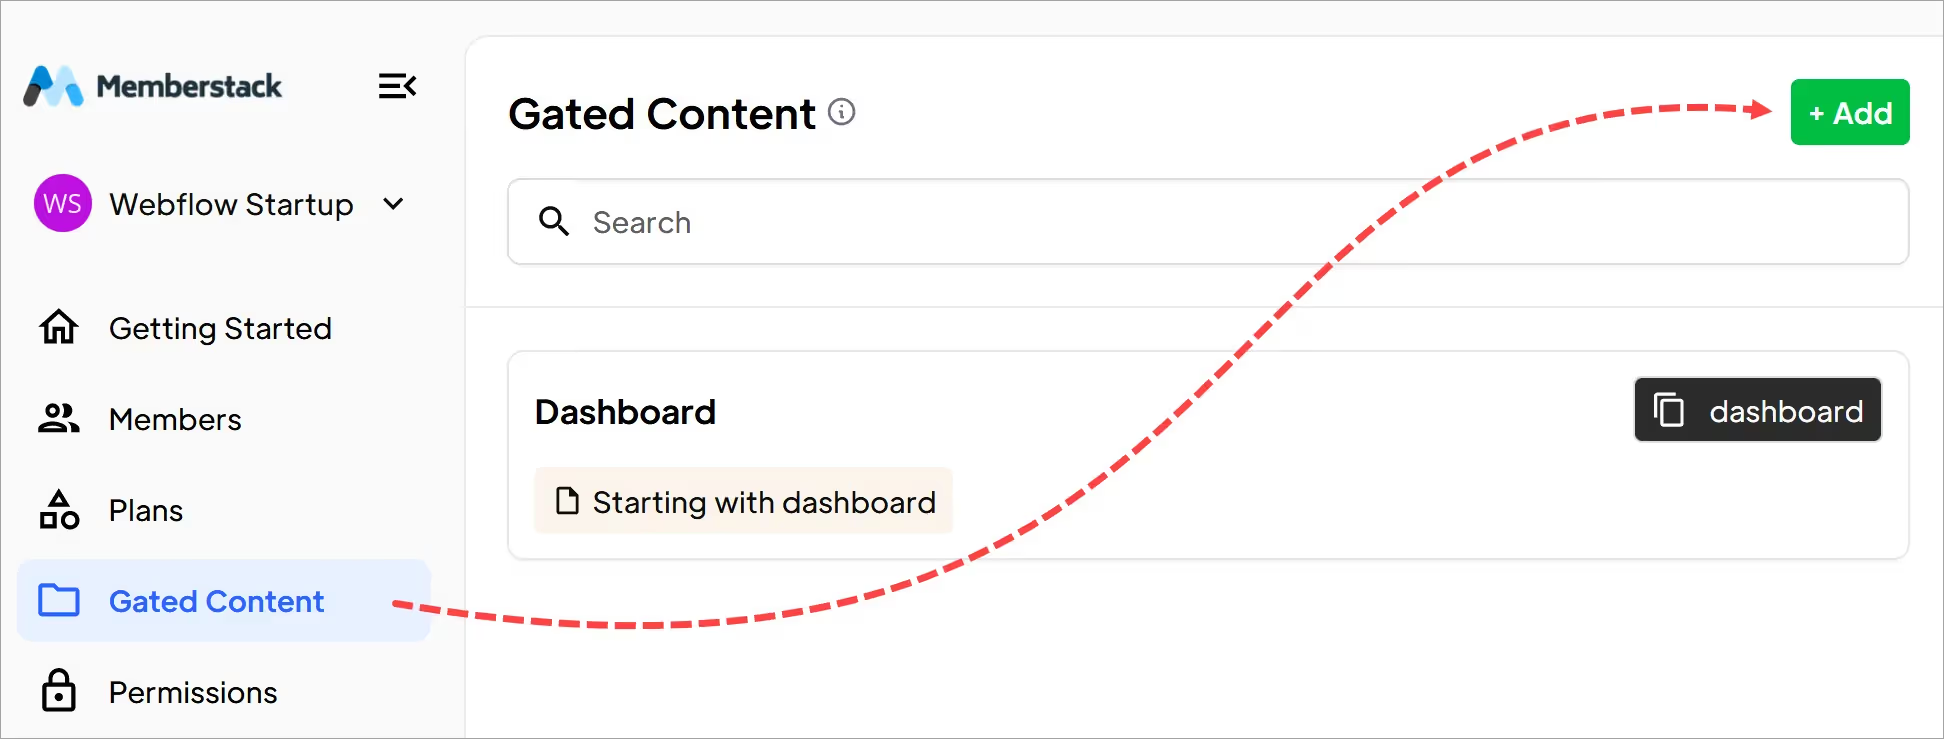
- Klicken Sie im Seitenmenü auf Gated Content und dann auf die Schaltfläche Hinzufügen.
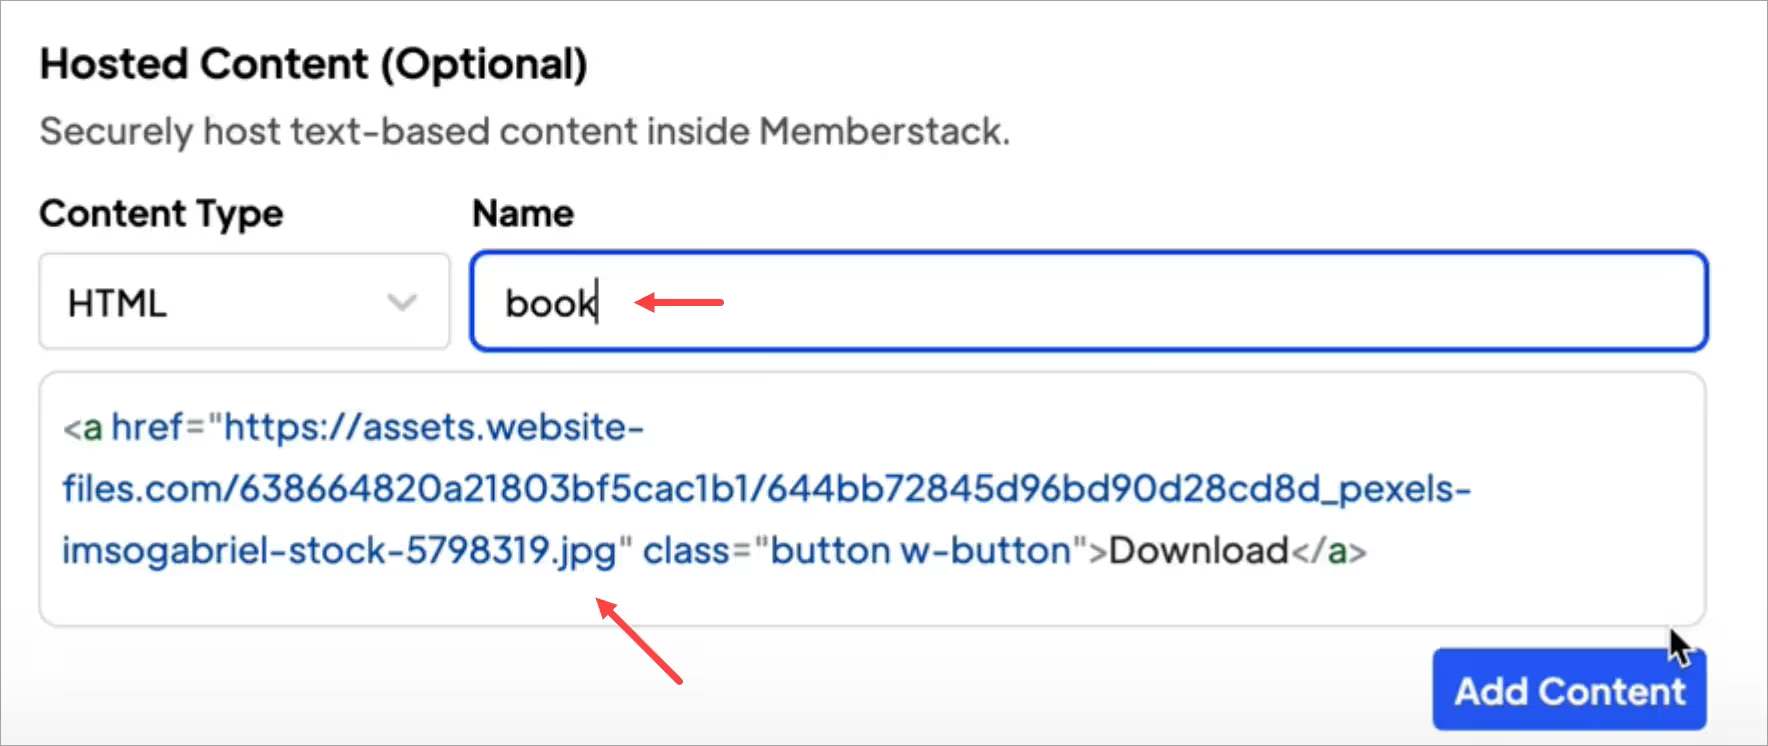
Blättern Sie nach unten zur Überschrift Hosted Content (Optional).
- Vergewissern Sie sich, dass im Feld Inhaltstyp HTML steht.
- Fügen Sie den Webflow-HTML-Code in das Feld ein.
- Geben Sie einen Namen für den Inhalt ein.
- Klicken Sie auf die Schaltfläche Inhalt hinzufügen.
Um den Inhalt zu speichern, müssen Sie die restlichen erforderlichen Felder ausfüllen. Geben Sie bei Bedarf Platzhalterinformationen ein.
Erstellen eines Ladezustands
Erstellen Sie nun einen Ladezustand auf Webflow. Dieser Zustand zeigt dieselbe Download-Seite an, entfernt aber den gesicherten Inhalt.
- Gehen Sie zurück zur Webflow-Download-Seite.
- Wählen Sie das gehostete Element auf der Leinwand aus.
- Ich empfehle, alle sensiblen Informationen, Inhalte und Links durch Platzhalter zu ersetzen. Versuchen Sie, wann immer möglich, die Klassennamen gleich zu halten, damit sie in Webflow gespeichert werden.
- Ihr Platzhalterinhalt wird nicht lange sichtbar sein (in der Regel weniger als eine halbe Sekunde), aber es ist trotzdem ratsam, ihn ansprechend zu gestalten.
In diesem Beispiel habe ich den Download-Link entfernt und den Text der Schaltfläche geändert.

- Wenn ein Besucher der Website auf die Schaltfläche auf der Live-Seite klickt, passiert nichts.

Hinzufügen eines Attributs
Fast fertig!
- Gehen Sie zurück zur Memberstack-Website.
- Gehen Sie zum Abschnitt Hosted Content.
- Klicken Sie auf die Schaltfläche HTML-Installation.
- Klicken Sie im Popup-Fenster auf das Kopiersymbol
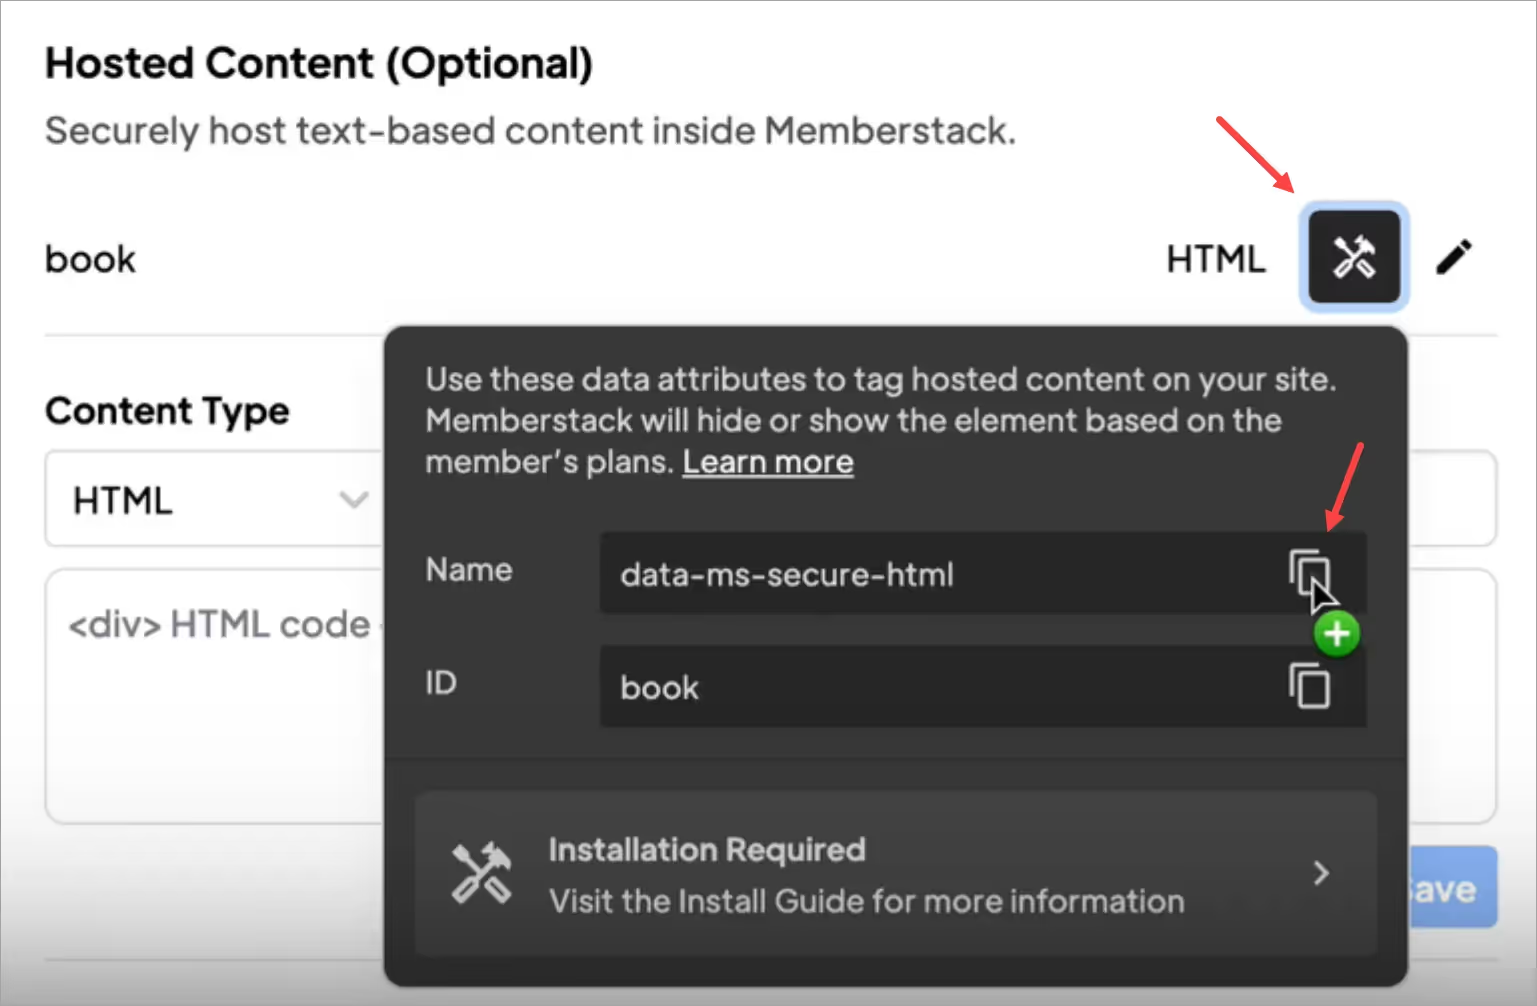
Gehen Sie zurück zu Webflow.
- Wählen Sie das Schaltflächenelement aus.
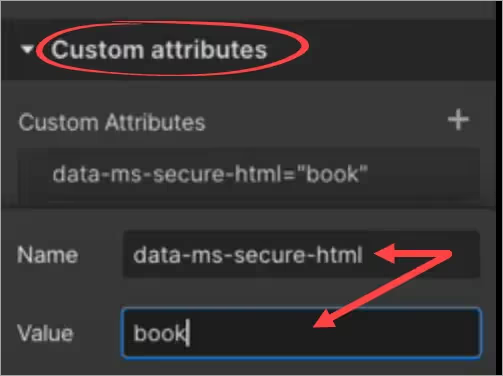
- Öffnen Sie in der rechten Leiste den Ordner Benutzerdefinierte Attribute.
- Fügen Sie die Attribute Name und Wert ein.
- Klicken Sie auf Veröffentlichen.
Testen Sie den Link
Rufen Sie die Live-Webflow-Seite auf und melden Sie sich an. Webflow zeigt eine aktive Schaltfläche und einen Download-Link an.

Das war's.
Sie haben eine Schaltfläche mit einem sicheren Link zu geschützten Inhalten erstellt.
Hinzufügen einer sicheren Verbindung
Mit dieser Funktion können Sie dynamisch Links für Mitglieder einfügen. Der Link wird nur für eingeloggte Mitglieder angezeigt.
Gehen Sie zurück zum Abschnitt Hosted Content in Ihrem Memberstack-Dashboard.
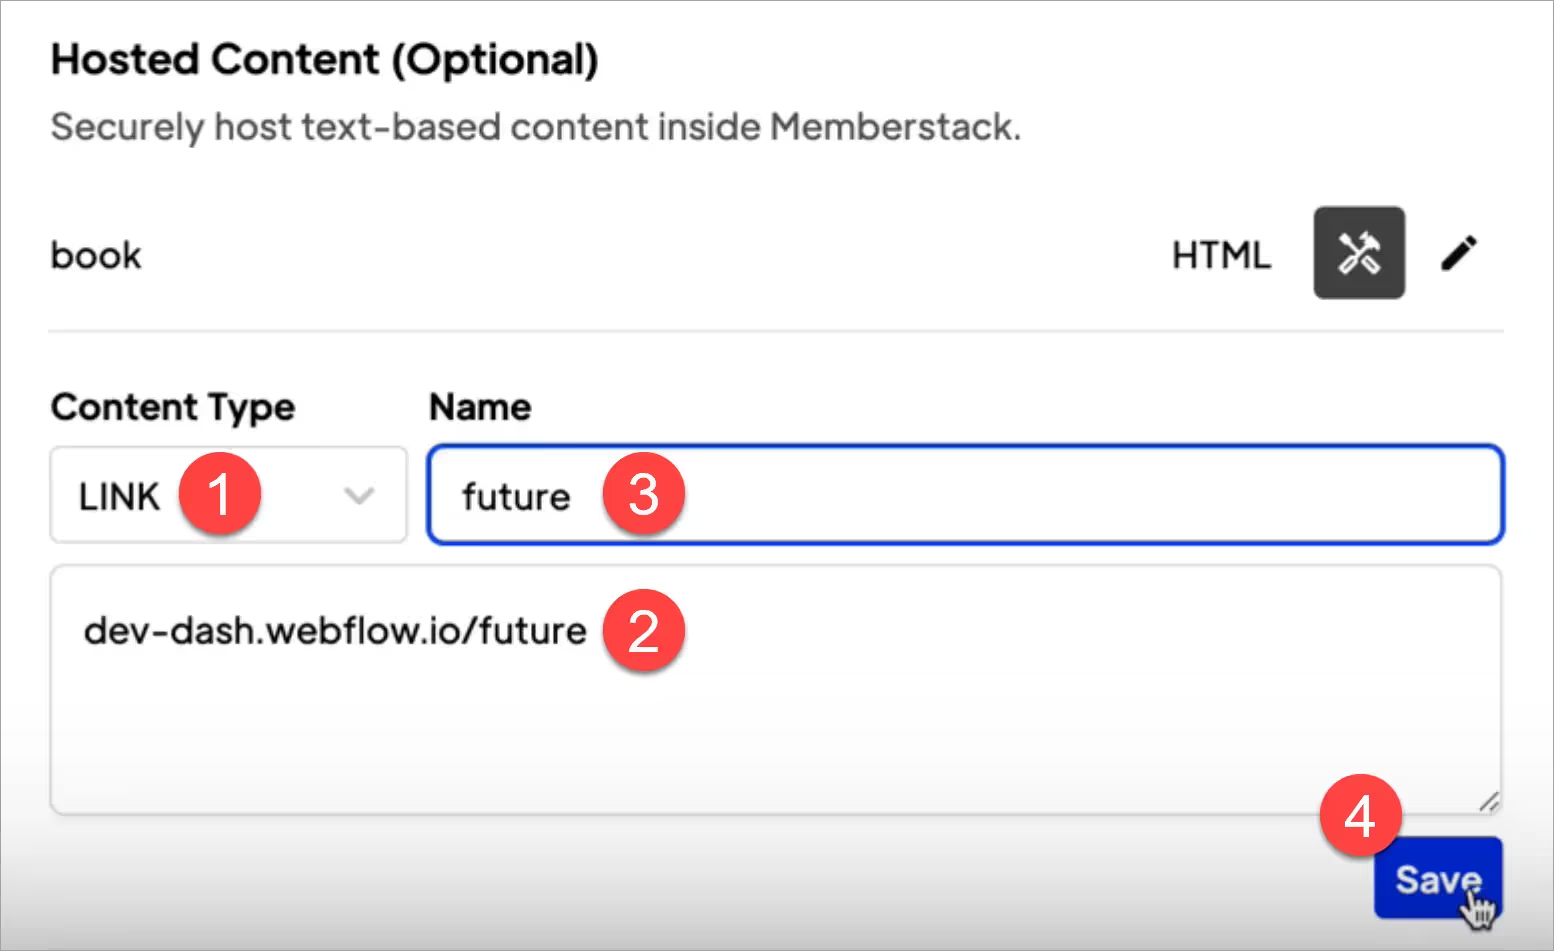
- Klicken Sie auf das Feld Inhaltstyp und wählen Sie Link.
- Fügen Sie die URL der gesicherten Seite ein (Download, Dropdrop-Box-Link, Youtube-Video, etc.).
- Fügen Sie einen Namen für diesen Link hinzu.
- Klicken Sie auf Speichern.
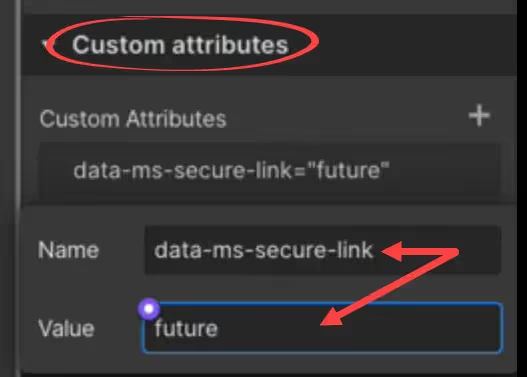
- Kopieren Sie im Popup-Fenster die Datenattribute für diesen sicheren Link.
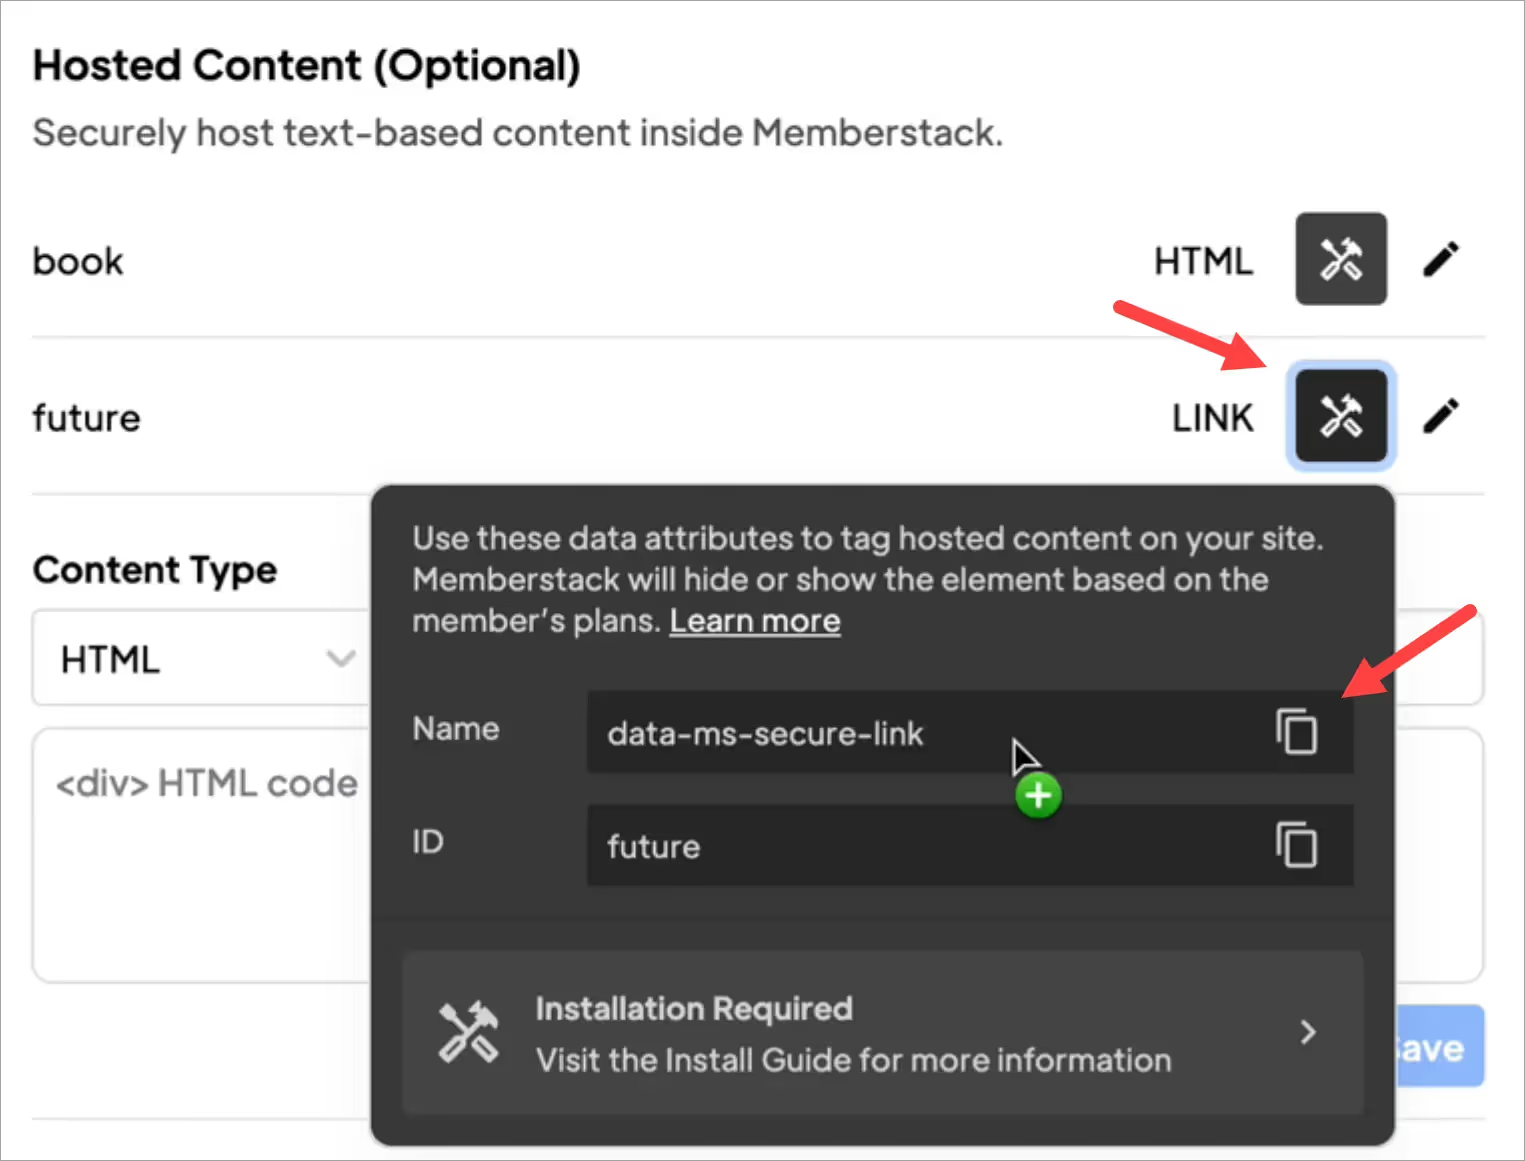
- Gehen Sie dann zurück zu Webflow. Und fügen Sie einen Link zu Ihrer Website hinzu. In diesem Beispiel habe ich einen Link zur Navigationsleiste meiner Marketing-Website hinzugefügt.

- Öffnen Sie die Benutzeroberfläche für benutzerdefinierte Attribute.
- Fügen Sie die Link-Attribute ein.
- Klicken Sie auf Veröffentlichen.
- Rufen Sie die Live-Seite auf und melden Sie sich an. Webflow zeigt den Link zum gesicherten Menü an.

- Wenn ich auf den Menülink klicke, öffnet Webflow die richtige Seite.
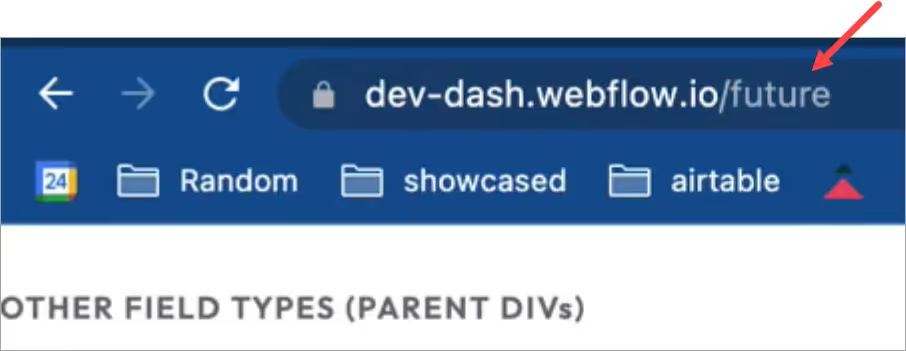
- Wenn ich mich von der Website abmelde, entfernt Webflow den Link zum gesicherten Menü.

Das war's.
Jetzt wissen Sie, wie man Links für gesicherte Inhalte erstellt, die zu Download-Schaltflächen oder einer Navigationsleiste hinzugefügt werden können.
Möchten Sie mehr über Memberstack erfahren? Treten Sie unserer Slack-Community mit über 5.500 Mitgliedern bei!
Treten Sie der Memberstack-Community Slack bei und fragen Sie los! Erwarten Sie eine prompte Antwort von einem Team-Mitglied, einem Memberstack-Experten oder einem anderen Community-Mitglied.
Unserem Slack beitretenÄhnliche Merkmale
Benutzerdefinierte Fehler- und Erfolgsmeldungen
Sie können alles selbst gestalten. Einschließlich der Fehler- und Erfolgsmeldungen, die Memberstack anzeigt, wenn eine "E-Mail ist bereits vergeben" oder ein "Profil wurde aktualisiert".
Mehr erfahrenStornierung Einblicke
Erfassung der Stornogründe von Kunden über die vordefinierte Benutzeroberfläche von Stripe.
Mehr erfahrenWebflow-Komponentenbibliothek
Ständig wachsende Bibliothek mit mehr als 200 individuell erstellten Webflow-Komponenten.
Mehr erfahrenÜbersetzung
Erstellen Sie Ihre eigene Benutzeroberfläche und stellen Sie den Text in jeder gewünschten Sprache ein. Übersetzen Sie auch gehostete Seiten, Fehlermeldungen und Erfolgsmeldungen.
Mehr erfahrenAlle Funktionen anzeigen →
Bauen Sie Ihre Träume
Memberstack ist 100% kostenlos, bis Sie bereit sind, zu starten - worauf warten Sie also noch? Erstellen Sie Ihre erste App und beginnen Sie noch heute mit der Entwicklung.


.png)